SID finding Guide
Overview
This guide will teach you how to find the Secret ID of a pre-existing savefile using either your Starter Pokémon or one of the guaranteed shinies you can get.
The Starter method can be used in both BW1 and BW2 and is much more precise than the guaranteed shiny method, which is also only available in BW2. You should only use the guaranteed shiny method if you do not have your Starter anymore.
Huge shoutouts to happylappy for coming up with the guaranteed shiny method and helping me understand it, so that I could write this guide for you all!
Requirements
For both methods, ALL three of the following need to be true:
- You must still own the cartridge you originally created this savefile on.
- You must still own the console you played on when you created this savefile.
- You must have loaded the game from the home menu and then continued to create your savefile without soft resetting in between at all.
Especially the third point can be a problem, as anyone that didn't buy the game brand new probably deleted the old savefile and then immediately proceeded to create a new savefile. This counts as soft resetting for the game and thus would lead to these SID finding methods not working for anyone affected by that.
Starter method
For the Starter method, both of the following also need to be true:
- You must still have the Starter you got when you started this savefile. It can still be on this savefile or even in any other Pokémon game such as another Gen 5 game or even any newer games like Scarlet and Violet.
- You must have created your savefile and received the Starter in one go, so without having reset the game in any way in between.
One easy way to immediately know if you did not create your savefile and immediately got your starter in one go is to check if the Starters met date and the savefiles "ADVENTURE STARTED" date on the back of your trainer card match. If they don't match, you most certainly did not get both in one go (though it is possible in extremely rare cases, if the day rolled over midnight in between). But just because the two match doesn't necessarily mean that you did get both in one go. So all this can help with is to confirm that the dates match so you can proceed with this method.
If both conditions are true for your savefile, you can proceed with the Starter method.
Should either of the two additional conditions not be true AND you're playing on BW2, check out the guaranteed shiny method. If you're playing BW1, you're unfortunately out of luck and cannot find your SID outside of starting a new savefile (or hacking).
This method involves first finding all the possible SIDs that you may have hit when creating your savefile, then calculating your Starters IVs and with that information finding all the possible Starters you may have hit after creating your savefile. Afterwards you input all that data into a tool on our website and it'll compare the data to find any matches.
Guaranteed shiny method
For the guaranteed shiny method, there's only one additional condition:
- You may NOT yet have caught/received either the guaranteed shiny Haxorus in the Nature Preserve or the guaranteed shiny Gible (B2) / Dratini (W2) you get as a reward for beating Benga on the 10th level of the Black Tower (B2) / White Treehollow (W2).
This method involves first finding all the possible SIDs that you may have hit when creating your savefile. Next you'll RNG manipulate a guaranteed shiny for perfect IVs several times in a row and write down specific data you get every time; so make sure NOT to save after catching / receiving the shiny. In the second to last step you'll use a tool on this website that can do maths with all of that information to significantly narrow down the number of SIDs and at the very end you'll have to do some test RNG manipulations to test out which of the remaining possible SIDs is actually the one you got.
For the part where you RNG a perfect IV guaranteed shiny, you can use any DS console + cartridge combination you'd like, but for the TID/SID combo finding, you NEED the console + cartridge combination that the savefile was originally created on.
If you have both of the guaranteed shinies still available, it'd be better to do this with Haxorus, as the method is a lot faster with it. This is due to Haxorus having a randomized ability and gender, whilst Gible / Dratini are both locked to always being male here and they both only have 1 ability, making it impossible to tell whether you got ability slot 0 or ability slot 1. What we seek to find with this method is what we're calling a "JTSV" that'll help us find our SID. Whilst Haxorus can get us down to 1 exactly specific JTSV, Gible / Dratini can only ever get us down to 4 different JTSVs meaning there'll be a lot more trial and error for you.
You also have to be far enough into the game to be able to actually go and get the shiny.
To get access to Haxorus, you need a complete regional Pokédex. "Complete" in this context just means having seen every Pokémon, not caught. You will always be missing out on the version exclusives of Rufflet and Skitty if you're playing Black 2 or Vullaby and Buneary if you're playing White 2, due to no trainer in the entire game using them in battle (outside of battle facilities like the Battle Subway, but those don't register in your Pokédex).
If you wish to / have to go for Haxorus, you will need to trade for those two using either the Wi-Fi Club for direct trades without restrictions, or the GTS for indirect trades. The GTS has an additional restriction of having to have already registered the Pokémon you wish to trade for as seen in your Pokédex, meaning you'd need to try and trade for their evolutions, as those are used in battle by some trainers ingame letting you register them.
To get access to Gible / Dratini, you "just" have to beat Benga on the 10th level of the Black Tower / White Treehollow and can then receive it in Alders Home in Floccesy Town.
The Guide
Finding all possible SIDs
This is the first step required for both methods. For this you need to have the calibration for the DS console + DS cartridge combination that originally started this savefile. Should you not have calibrated that combination yet, you can do so following our Calibration guide.
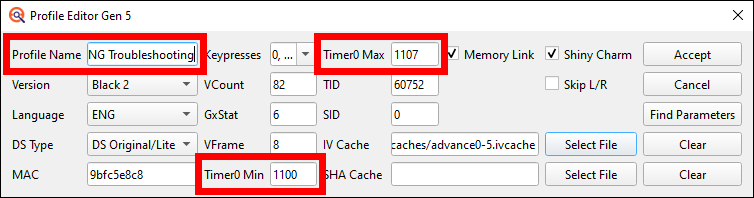
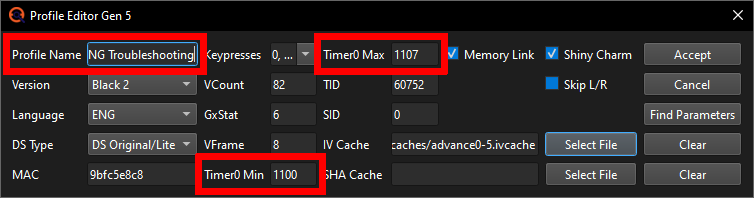
In PokeFinder, open up the Profile manager, select your games RNG Profile and click on the duplicate button at the top. Now open the duplicated Profile, rename it to something like "Troubleshooting" (since it'll be useful for Troubleshooting other RNGs unrelated to this SID finding later) and edit the Timer0's.
For BW1 players, put the Timer0 Min to the lower and the Timer0 Max to the higher of the two Timer0's that you can hit. Should you not know what your other Timer0 is, you can just calculate your current Timer0 +1 and -1. If your Timer0 is C79 for example, the Min for this profile would be C78 and the Max would be C7A (since these are Hexadecimal numbers counting 1-9, then A-F and only then going to 10).
BW2 players on the other hand need to set the Timer0 Min and Max to incorporate the full range of Timer0's you can get +1 and -1. I got all the Timer0s from 1101 to 1106 during my profile calibration, so now I'll calculate -1 and +1 to get 1100 and 1107 and put those as my Min and Max Timer0 into the Profile. If you did not write down the full Timer0 range that you got, shame on you, but that's not the end of the world. You can instead just use the following input field to calculate your most common Timer0 -8 and +8 to be on the safe side.
00This will give you a larger Timer0 range than you can actually hit, thus making you get more invalid results than otherwise, but it's still going to be helpful in determining what you hit. Just not as efficient as knowing your actual Timer0 range would be. If I didn't know my full range already, I'd just input 1104 for example, as that is my most common Timer0, and this calculator would return me 10FC as the Min and 110E as the Max. But I do know, so I can just put my range to 1100-1107.

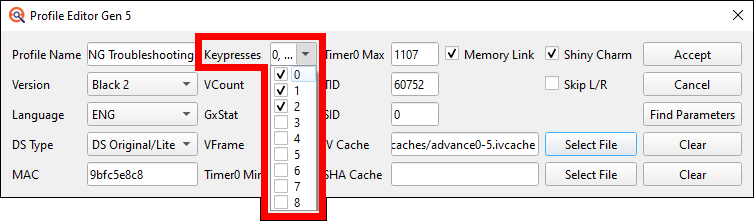
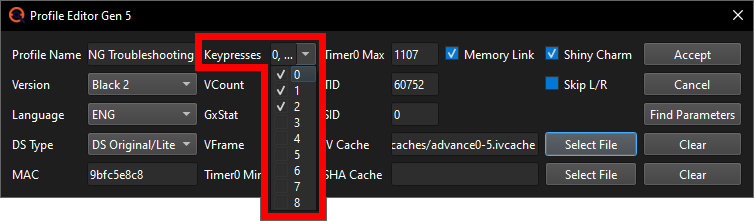
Also put the Keypresses to only include 0, 1 and 2 - no more! And don't forget to click on "Accept" once you're done.

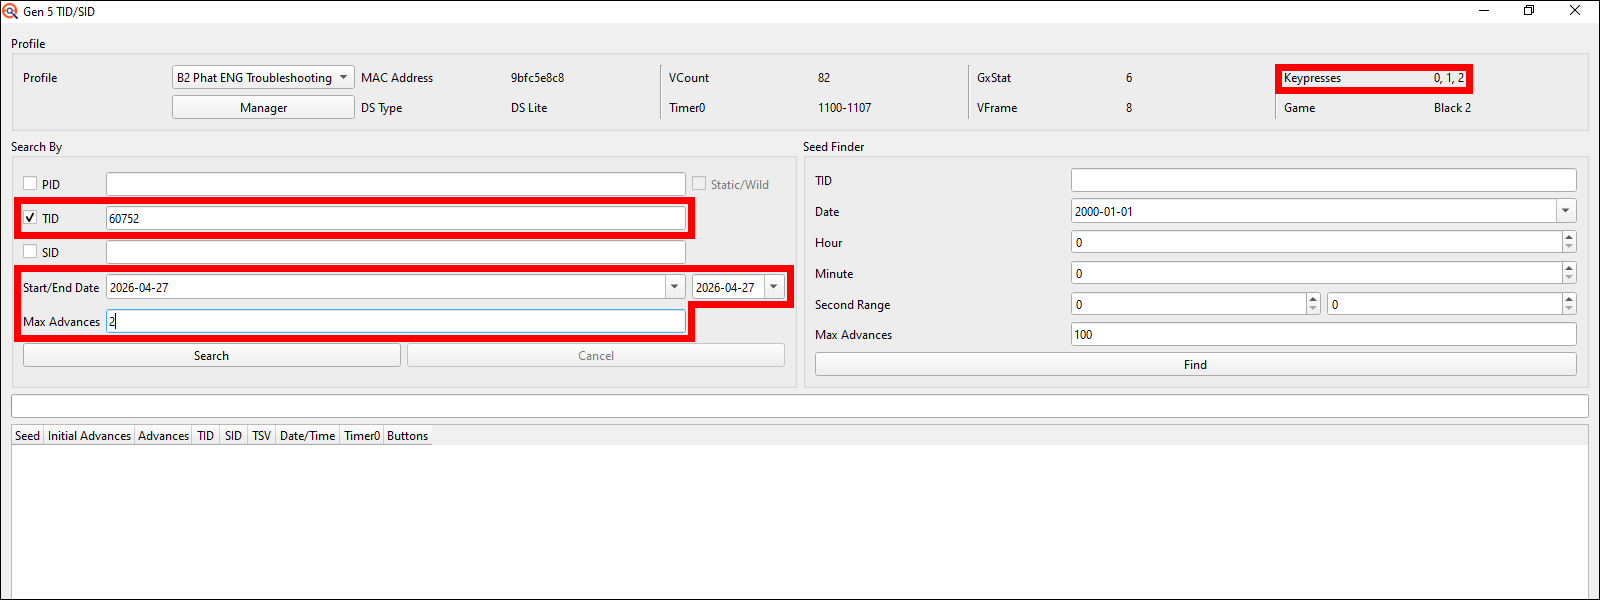
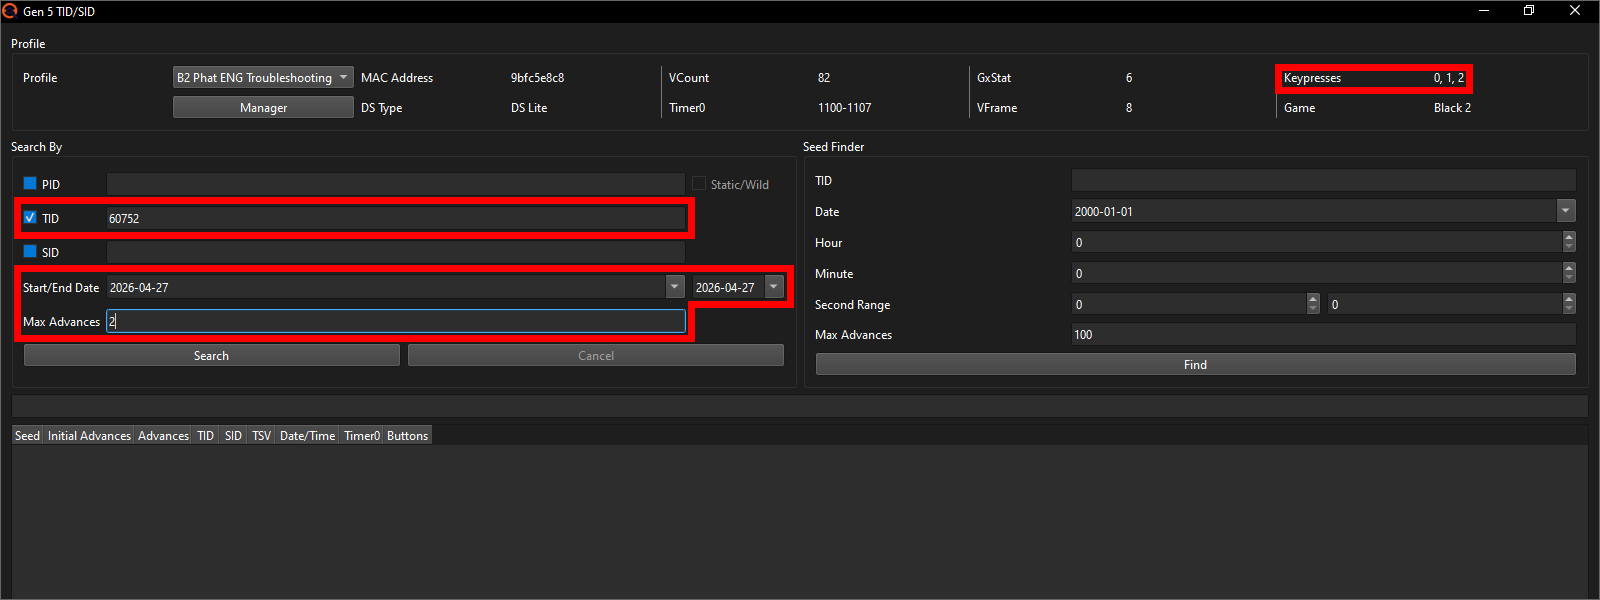
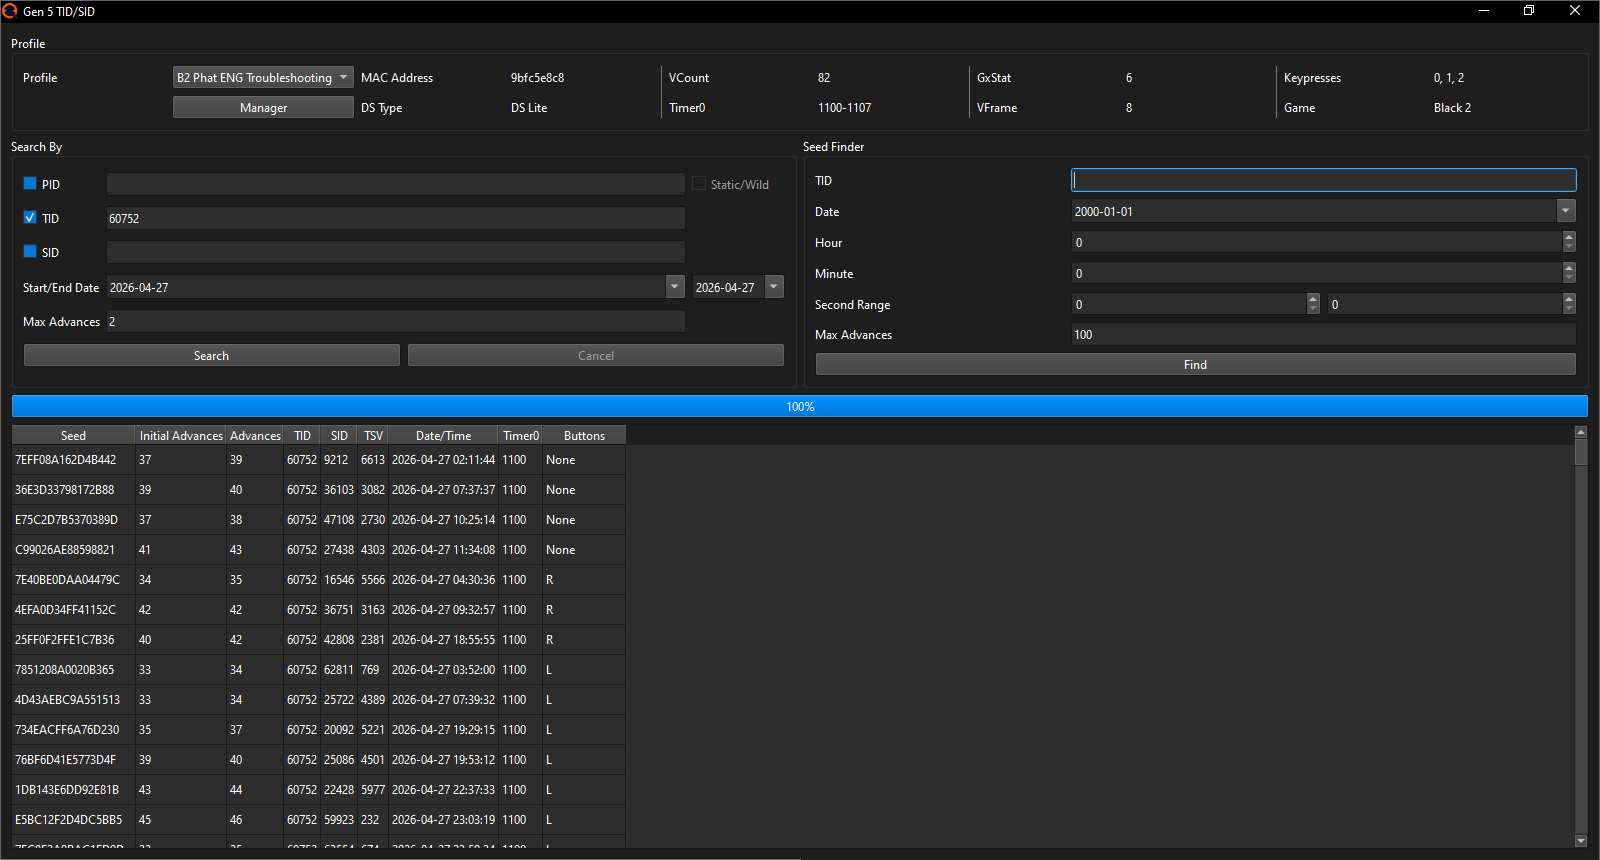
With the Troubleshooting Profile made, open up the Gen 5 IDs window, check off the TID box, input your Trainer ID, set both the Start and End date to the date that your trainer card says you started your adventure on and put the Max Advances to 2 exactly.


Now click on search and wait for it to finish up.
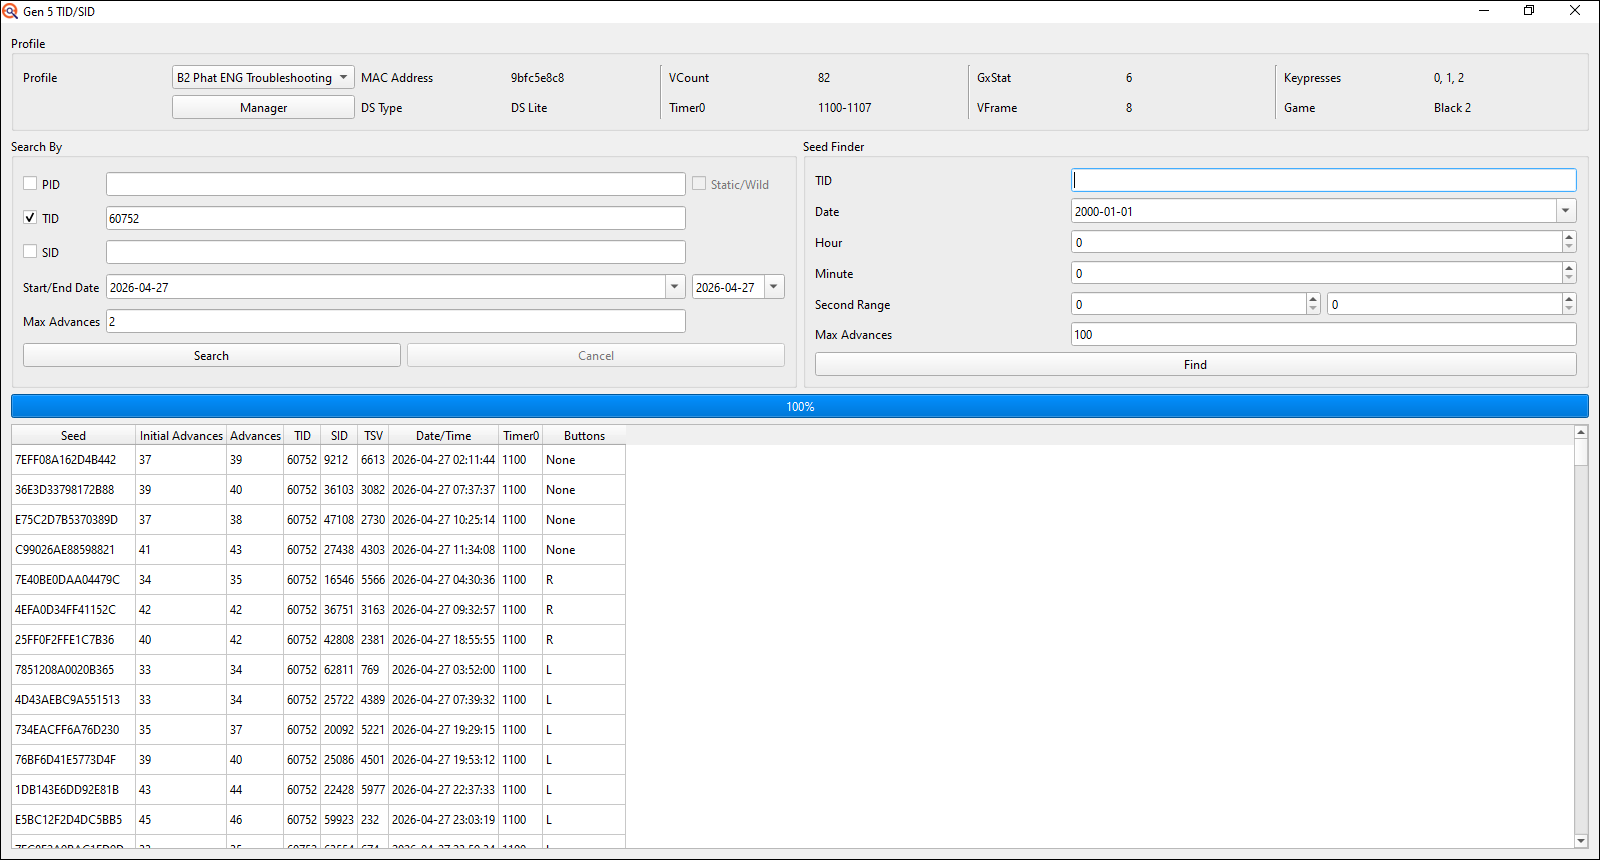
Once done, you will need to copy all of the results over to the SID tool. You can do this by either marking all of the results you got and then using the copy shortcut (e.g. ctrl+c on Windows; this did make my old laptop lag out a few times due to there being so many results lol) or by right clicking into the found results and clicking on the "Output Results to TXT" to save the results as a simple text file somewhere on your PC for easy copying. Whichever way you choose, you must paste the results into the SID tool afterwards and then it should look something like this:

Pick a method
Now that you got all the possible SIDs, it's time for the next phase. Pick the method that you wish to use to find your SID:
To continue with the Starter method, we first need to calculate our Starters IVs. This doesn't need to be perfectly precise, but the more precise the better. To be able to accurately calculate its IVs, we need to get rid of any EVs that the Starter may have gained in battle.
Unfortunately, for whatever reason, Game Freak decided not to give BW1 ANY options of reducing EVs within just the base game alone. You need to either trade for them or get them from the Dream World, which is now defunct.
So really your only options in BW1 are to trade your Starter over to BW2 or to transfer it up to a Gen 6 or newer game to to get rid of the EVs there.
To get rid of EVs in BW2, you have 2 options:
- Use the EV reducing Pomeg, Kelpsy, Qualot, Hondew, Grepa and Tamato Berries.
Here you'd give your Starter berries of each type, until each of them returns a message saying "Its base STAT can't go any lower." where the word STAT is just HP, Attack, Defense, Sp. Atk, Sp. Def or Speed, depending on what berry you gave it. You can buy them either in packs of 4 per day in Join Avenue flower shops that are at level 9 or 10 (there are 4 different possible inventories that each have 3 of the 6 EV reducing berries, so you'll need at least 2 flower shops with opposite EV reducing berry stock) or from a Breeder on Route 5 in packs of 5 per day (though you can't get Tamato berries from her). - Use Join Avenues Beauty Salon services.
Here you'd need to buy services until you have reduced each stat by at least 252 EVs to be sure that there is no amount of EVs left that could possibly change the results of our later IV calculation (doesn't need to be 255 necessarily, as up to 3 EVs don't raise a stat at all). You can check how much each service reduces by on Bulbapedia (it's possible that the salon worker will tell you if you reached 0 EVs, but I did not have any beauty salons on any of my savefiles to test this).
Once you've removed all the EVs from your Starter, open up a Static window in PokeFinder, switch to the Searcher tab and there click on the IV Calculator button to make an IV Calculator window pop up. Don't worry about any other settings in the Searcher yet, we'll get to that later.
Change the game to whatever game you're doing this IV Calculation in, select your Starter in its current evolution and input its Characteristic, Nature, level and stats into the IV Calculator.
Note: The Characteristics of your Pokémon are not in PokeFinder?
For English language games, the names of 2 of the Characteristics were
changed in Gen 6. Currently PokeFinder only uses the Gen 6+ names for
these, even for older generations. Other languages may have a similar
issue, but I am not aware of any table that tracks every language's
Characteristics change, so if you're RNGing on a non-English game, you
may have to figure this out by yourself using a Pokémon wiki site of
that language for example.

Now press the Find IVs button and you should be presented with some ranges in the bottom right.
My example most certainly already has precise enough of IV ranges here, with the largest ranges only having 2 possible options for the IVs (such as the HP being either 5 or 6 IVs), but just to be on the safe side I'll add additional levels using Rare Candies to this, in order to make the IV calculator perfectly precise (Since Rare Candies don't give an EVs, whilst battles do). I also click on Find IVs after every new added level to check whether I'm at exact IVs yet.
After inputting the stats of only 3 more levels I already am at 6 perfectly precise IV numbers meaning I can now switch back to the Searcher tab.
The IVs should have automatically been filled out. If they are not, fill them out to match the ranges / precise IVs that you got. Also make sure that the correct profile is selected at the top.
In the left half of the window put the Max Advances to 0 and the date range to only include the specific date that is marked as the "Apparently met at" date in your Starters summary. In my case that is the 27th of April 2026. You don't have to select the correct Starter of the three from the dropdown, but I'll do it anyways, just so it looks matching; it makes no functional difference however.
We also have to adjust the Min and Max Advances.
If you're on BW1, put the Initial IV Advances to 8 and if you're on BW2, put the Initial IV Advances to 12.
The Max IV Advances should be 10 in both cases (they start counting from the Initial Advances, so for BW1 this will make it search IV Advances 8-18 and for BW2 12-22).
Also leave the right half alone, so that Ability, Gender, Nature, Hidden Power and Shiny are all set to "Any".
Note: Why these Advance ranges?
During my testing I found the baseline of IV Advances that happen when starting a new savefile to be 10 in BW1 or 14 in BW2. Just in case there is some variation possible that I did not encounter, I subtracted 2 from both to get to 8 and 12 as the mininum respectively. After this, there is 2 additional factors that can advance the IVrng when creating a new save:
- The Minccino (BW1) / Cinccino (BW2) that Juniper shows you during the introduction moves and at the end of each movement cycle, the IVrng advances by 1 (despite there being nothing randomized about that from what I could tell). These Advances begin once the Pokémon is released from its Poké Ball and keep going until they Keyboard appears on the bottom screen to name yourself despite the Minccino / Cinccino having disappeared from the screen long before that. Realistically, if you're reasonably fast, you'll never have more than like 2-4 Advances happen from this.

- Telling Juniper "No" when she asks whether she got your name correctly advances both the PIDrng and the IVrng by 1 each time you do say no. It's unlikely that anyone would have more than 2-3 Advances from this whilst just playing normally, if any at all. In BW2 you can also rename your rival, but that has no impact on the Advances at all, whether you tell Juniper she got his name wrong or not.

This combines to a guessed realistic maximum of 7 Advances, but just to give it a bit more room, my recommendation is to calculate with 10 Advances. If you know that you likely really took your time during the intro sequence or renamed yourself a LOT of times, you may want to increase this to account for 20 or even more Advances. The higher you go, the less precise the results will be at the end however.
Now you can click on the Search button and wait for it to finish up with finding results.


Once done, you should be left with a handful or results at most. In my case, since I got the exact specific IVs, I got only 1 single result.
Should you get no results, it may be worth increasing the Max Advances to 20-30. Should you still get nothing, join im a blisy ._.'s RNG manip assistance Discord server and ask for help in the bw_b2w2 channel providing an explanation of the issue and a full window screenshot of your PokéFinder Static window.
Before you can continue with the guaranteed shiny method, you should already know how to RNG a Static encounter. I will not go over the fundamentals of how that works in this guide. If you do not know how to RNG a Static encounter yet, I would strongly recommend you to do a Static RNG to get a perfect IV Static encounter following our Static RNG guide. A simple and infinitely repeatable one would be e.g. a fossil, as you can get 1 per day for free from a worker in Twist Mountain. Do learn how to use either Chatot or saving the game to advance already as well, as it'll be mandatory for this guaranteed shiny SID finding method.
If you already know how to do a Static RNG and use Chatot / saving the game (or learnt it just now), you can continue.
Save in front of the Haxorus / Benga. If your target is Haxorus, be sure not to have a Pokémon with any of the following abilities in your leading party slot, as it may skew the results of this method leading to you not finding your SID:
Arena Trap, Compound Eyes, Cute Charm, Illuminate, No Guard, Quick Feet, Stench, Sticky Hold, Suction Cups, Synchronize or White Smoke.
These abilities all impact how Stationary encounters generate. Gift encounters are unaffected by lead abilities.
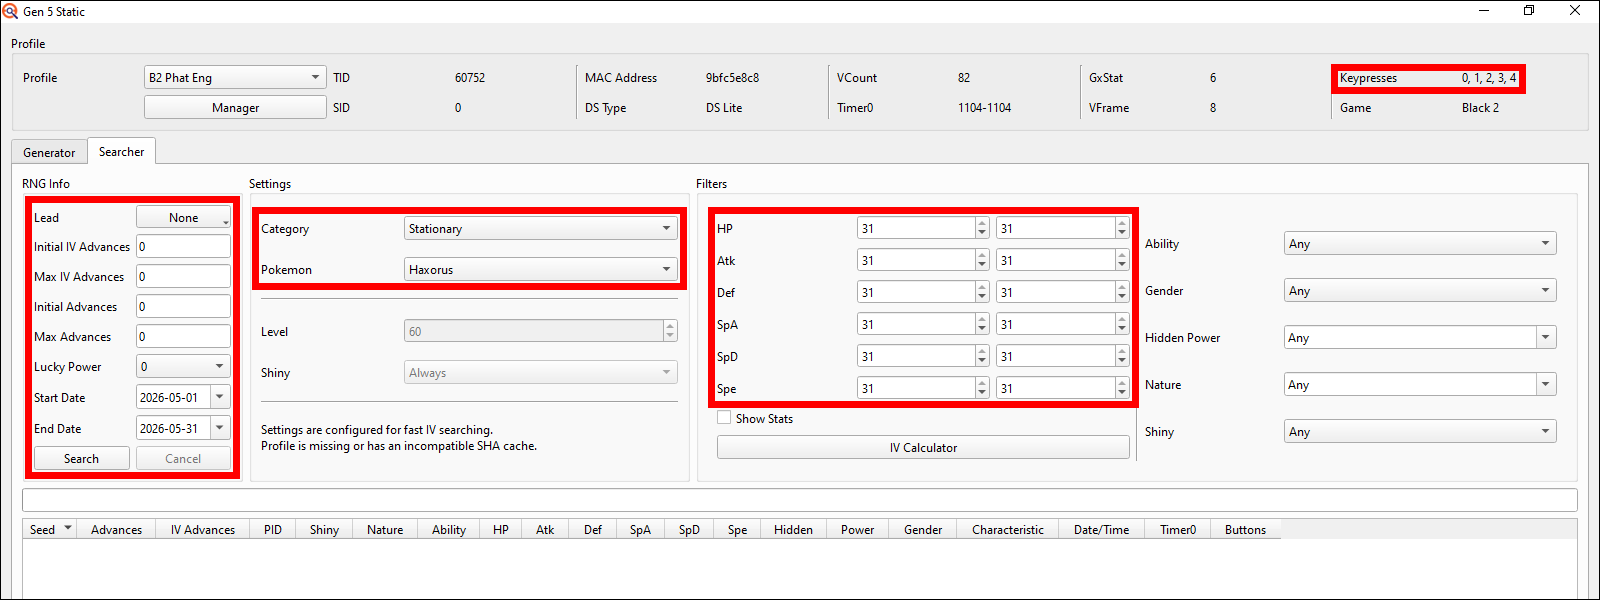
Next open up PokeFinder, open the Static window, switch to the searcher tab and make sure the correct games Profile is selected. I will showcase this method using Haxorus, so whenever I say Haxorus in this guide from now on, I also mean Gible / Dratini unless I specifically exclude them or write a section for just them immediately after.
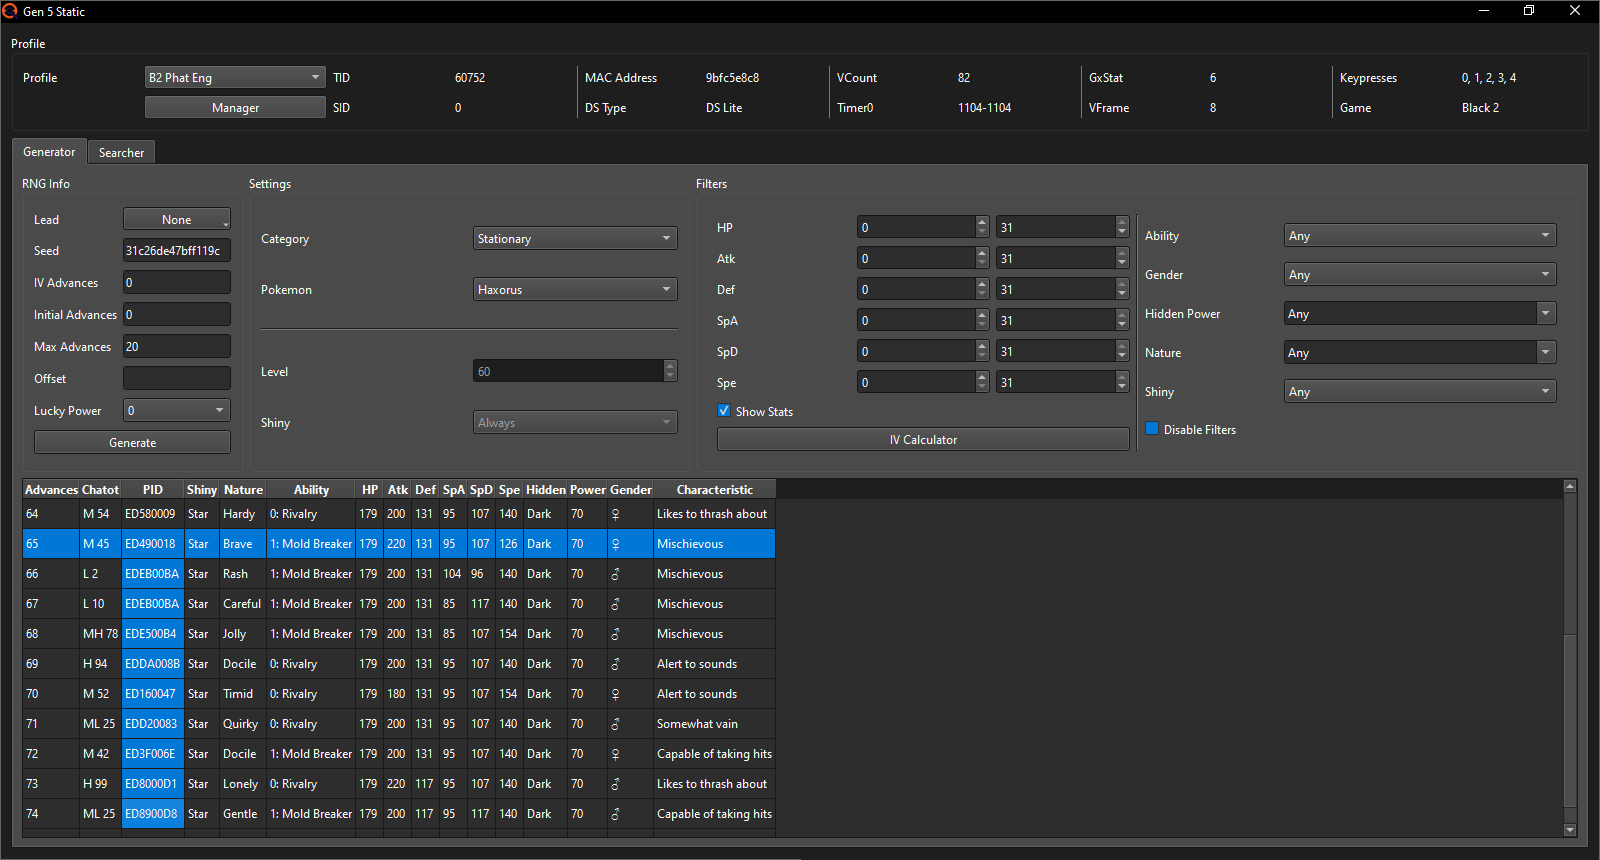
Then select Haxorus from the Stationary encounters, put the Max Advances to 0, put the date range to search through a full month and put the IV filters to all 31's (technically you can go for any of the exact same IV stat number you want to; so instead of 31/31/31/31/31/31 you could also go for 0/0/0/0/0/0, 1/1/1/1/1/1 etc.).

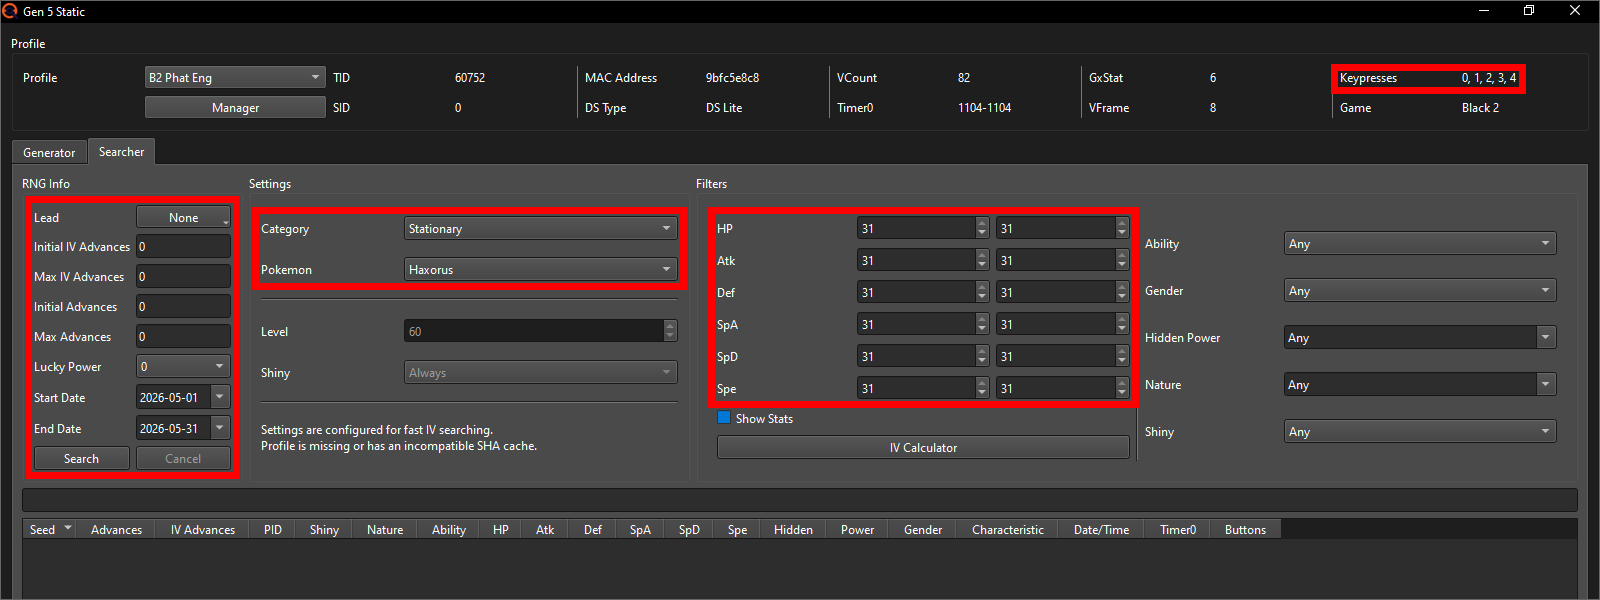
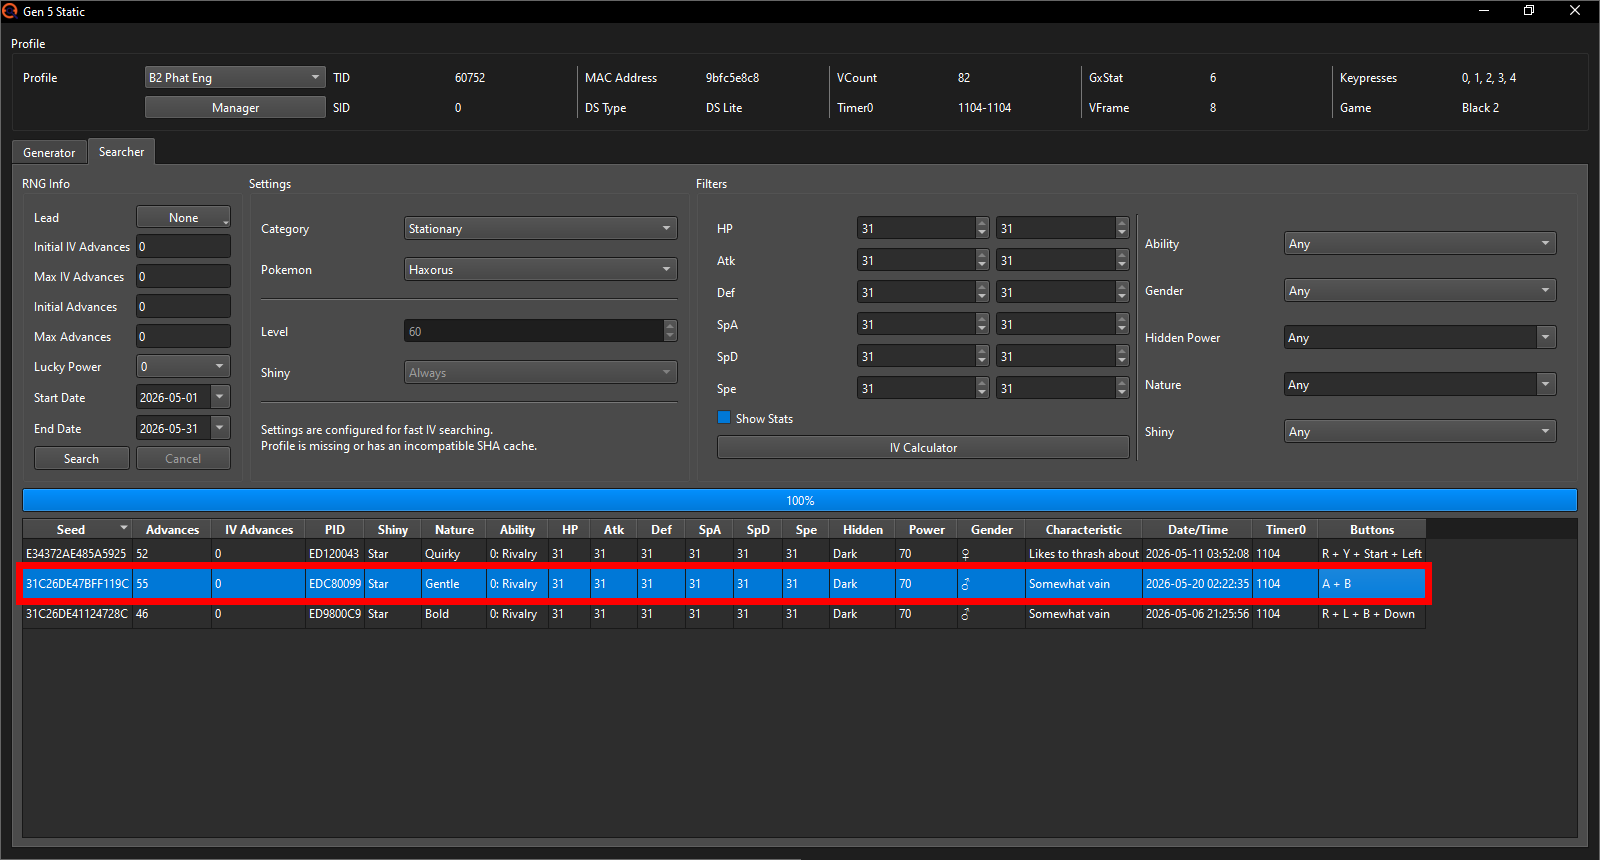
Finally, click search. Should you get no results, either search through another month or increase keypresses (I usually have up to 4 enabled in my Profile). Increasing Max Advances will have no effect here, as we're currently only searching for IVs and the IVs are not affected by the "regular" Advances.
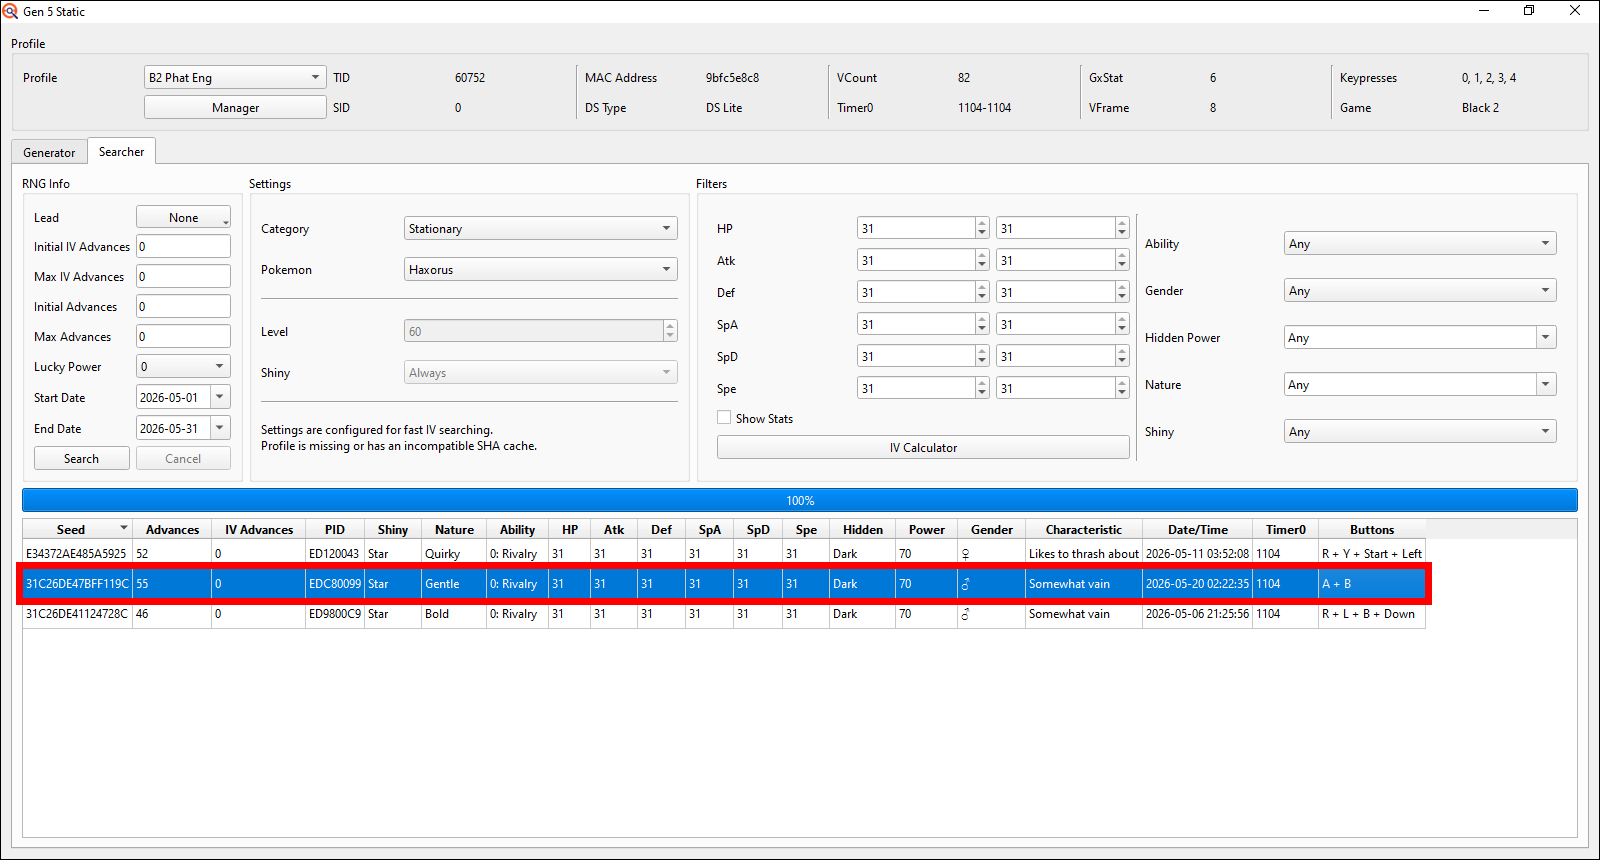

I'm going for this marked one on the 20th of May 2026 at 02:22:35 am since 35 is the easiest to hit target second of the three results for me.
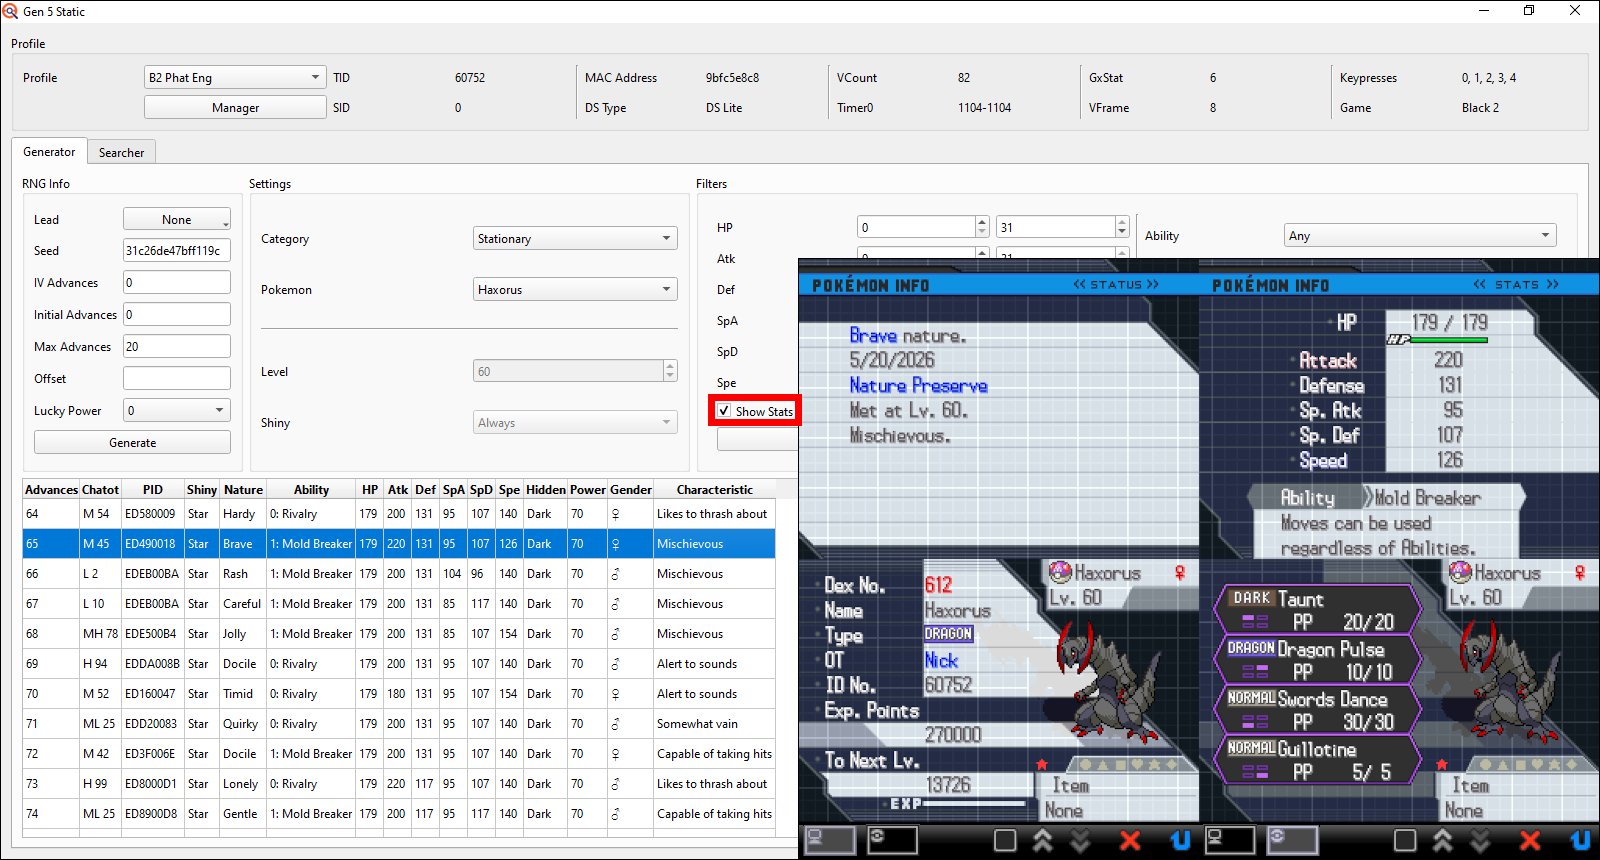
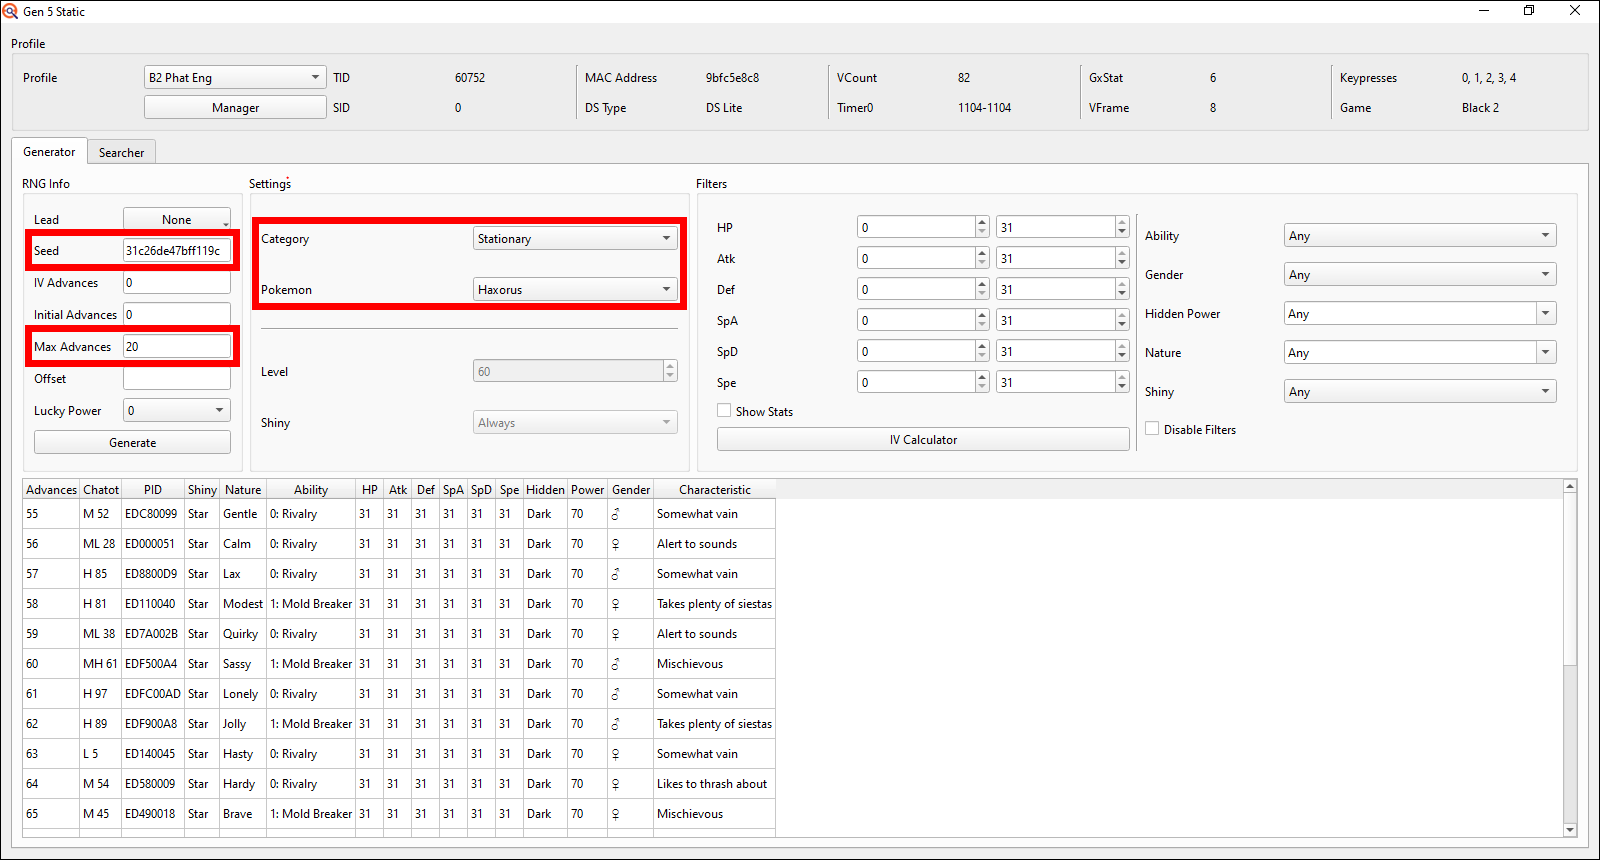
We can already copy our target Seed, switch over to the Generator tab, select Haxorus again, paste our Seed into the Seed field, put the Max Advances to 20 (if you're going for Gible / Dratini, increase this a bit to like 30-40) and then press generate.
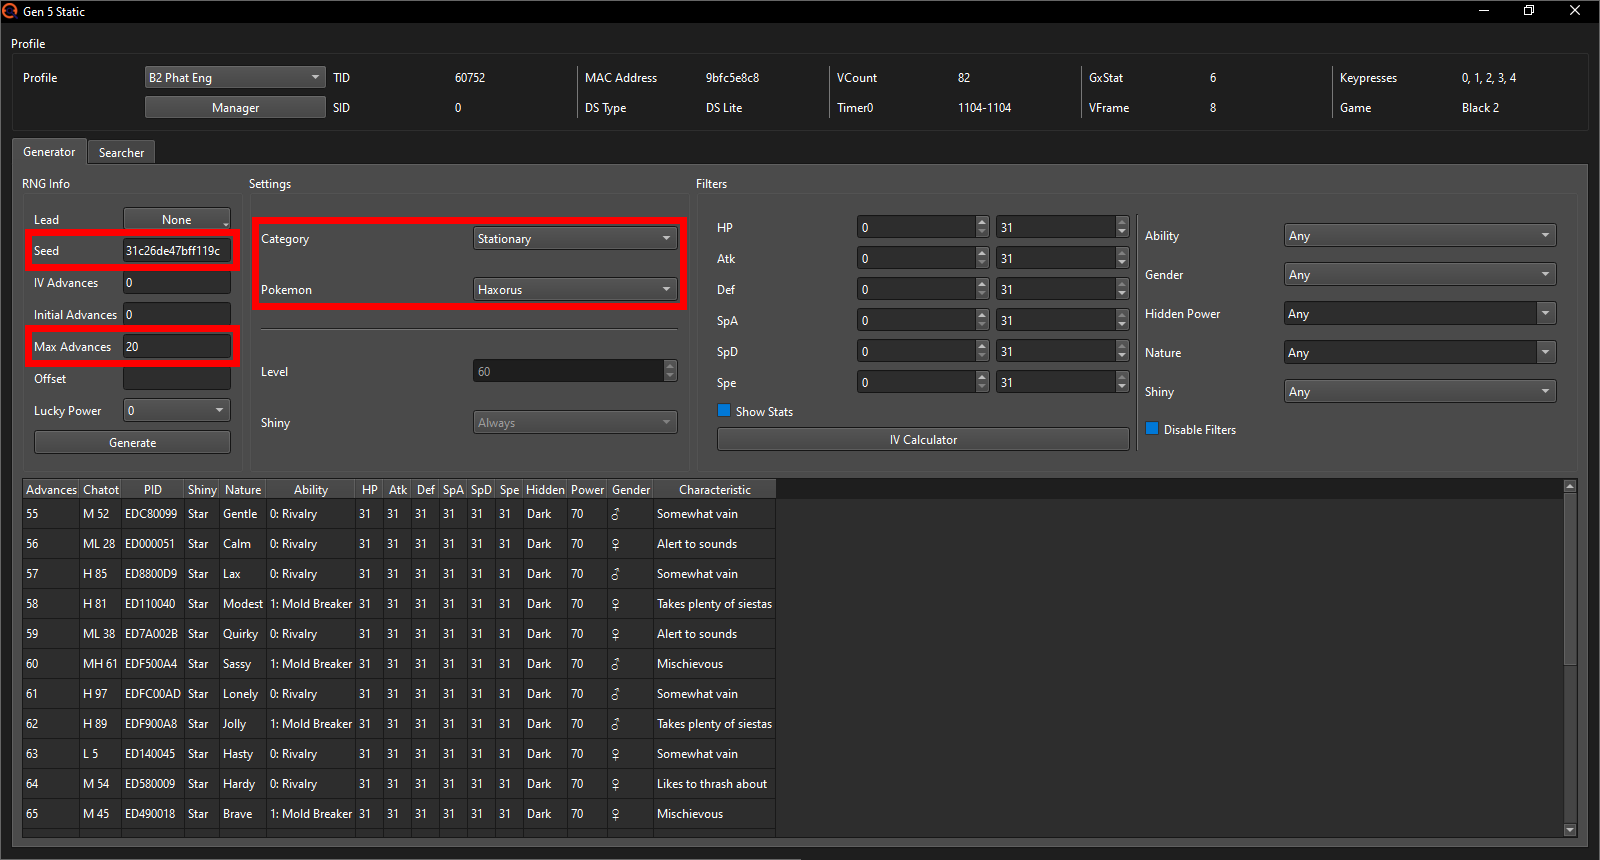
Now it's time to actually do the RNG - the first one at least. Do the RNG as per usual up until you load into the game and check whether you're on the correct seed using Chatot / save needles. There is no RNG noise nearby, so nothing that can advance the RNG randomly for both Haxorus and Gible / Dratini. Make sure you know exactly what RNG Advance you're on, and then you can encounter and catch the Haxorus (I recommend a Master Ball to save yourself some time) or receive the Gible / Dratini from Benga.
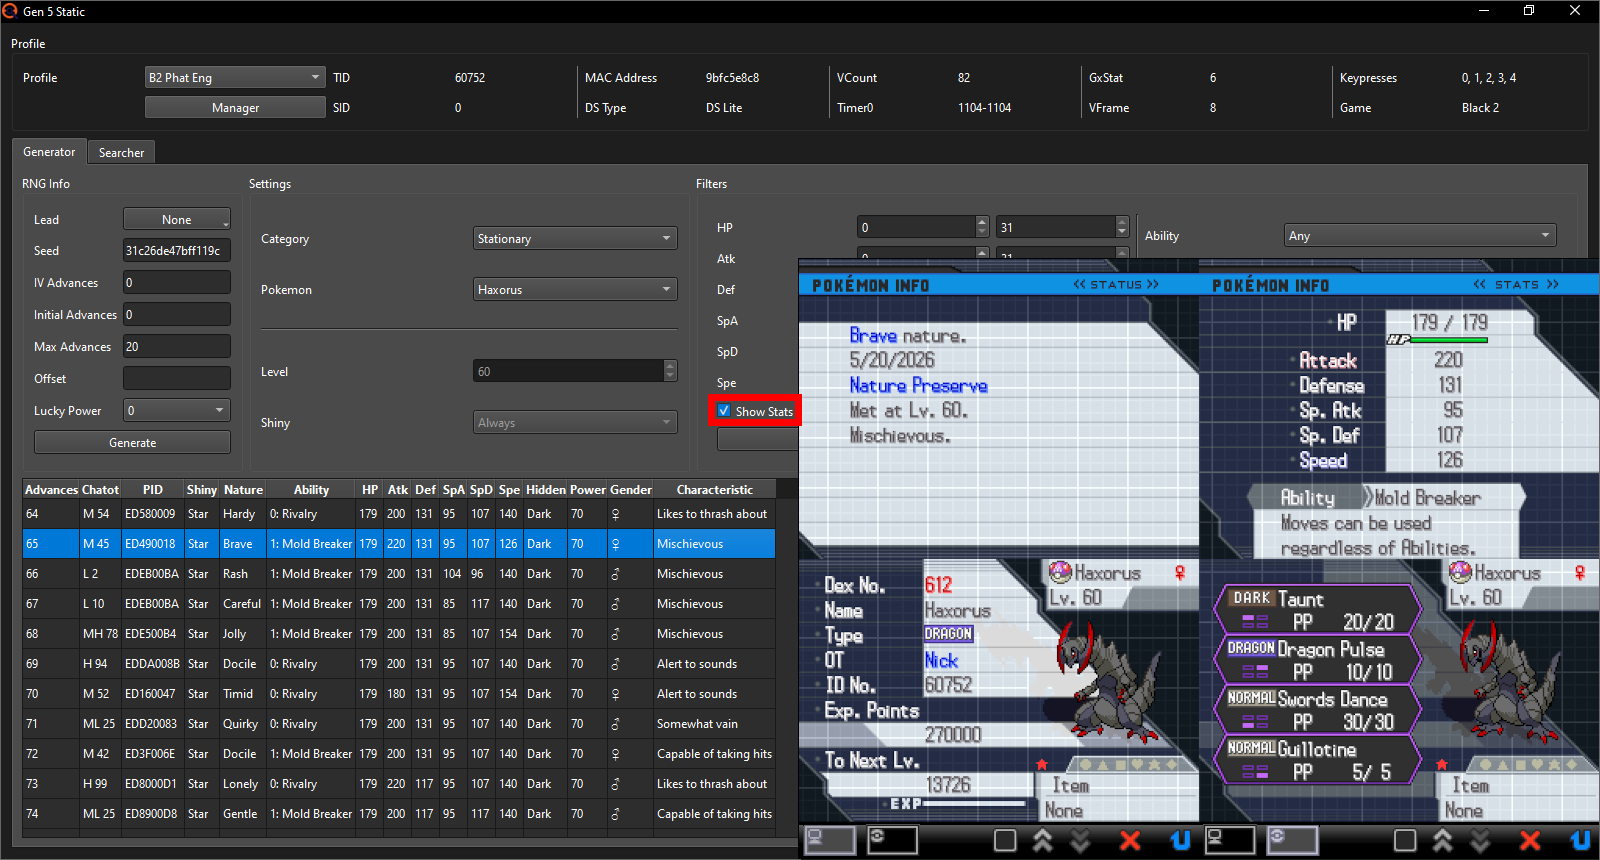
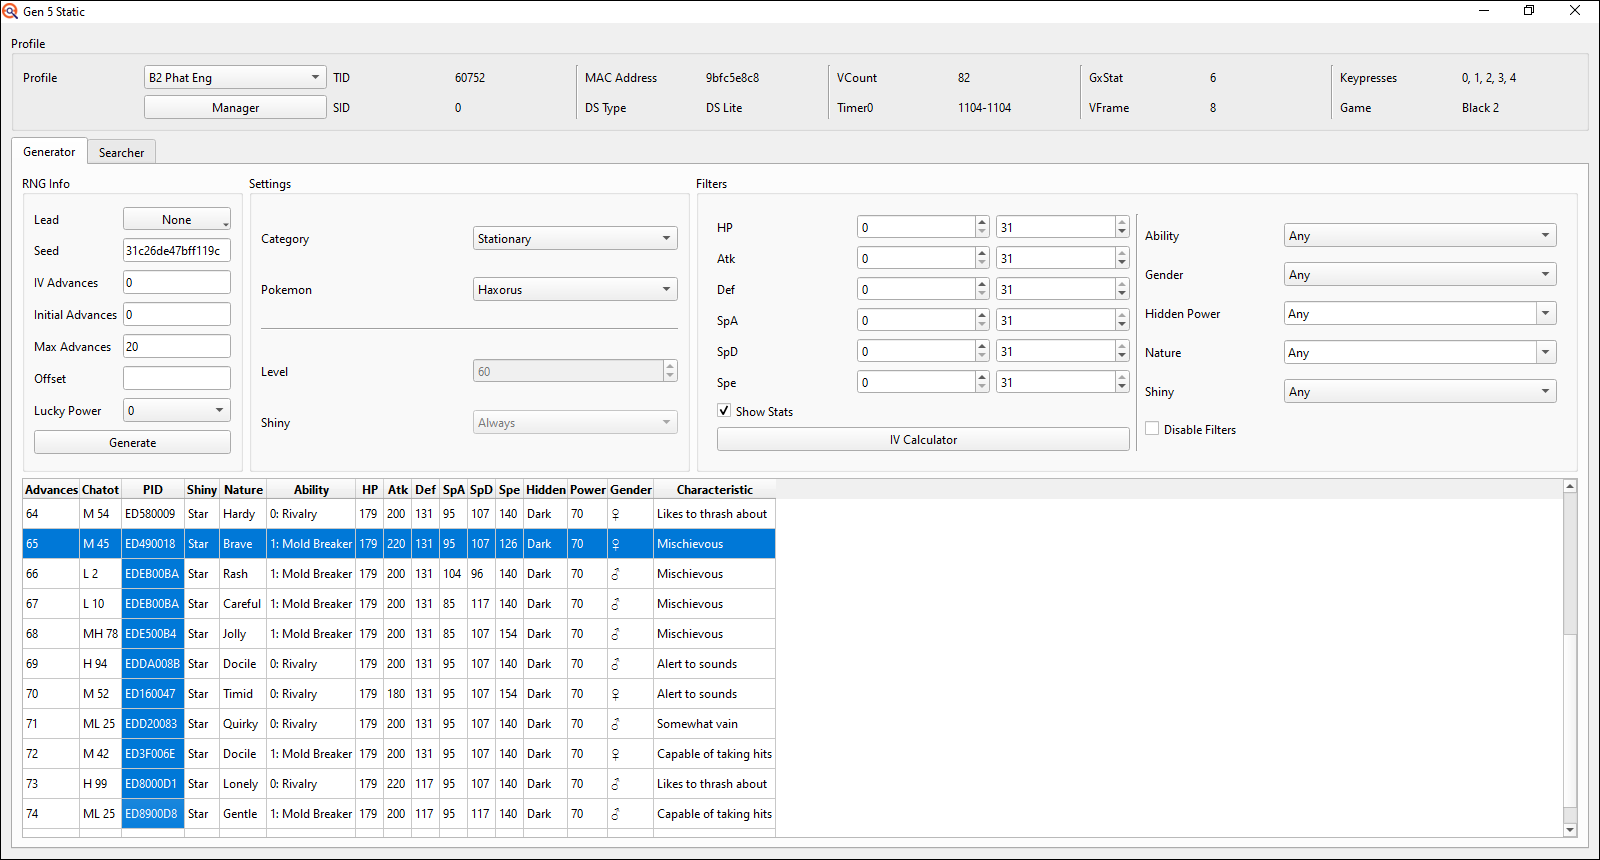
Once you got it, check it's stats to make sure they match the perfect IVs on the RNG Advance that has the correct Nature; this can fairly quickly be done without an IV calculator using the "Show Stats" checkbox in PokeFinder.


After doing 10 Chatot to confirm I'm on my target seed, the last Chatot I heard was on Advance 64 meaning I hit the Haxorus on Advance 65. As you can see in the image, the Stats and Nature match perfectly. Even the characteristic, gender and ability match in this case, but that will not always be the case here, which is precisely why the method even works. Depending on your SID, the PID and with that the characteristic, gender and ability of these Haxorus can differ.
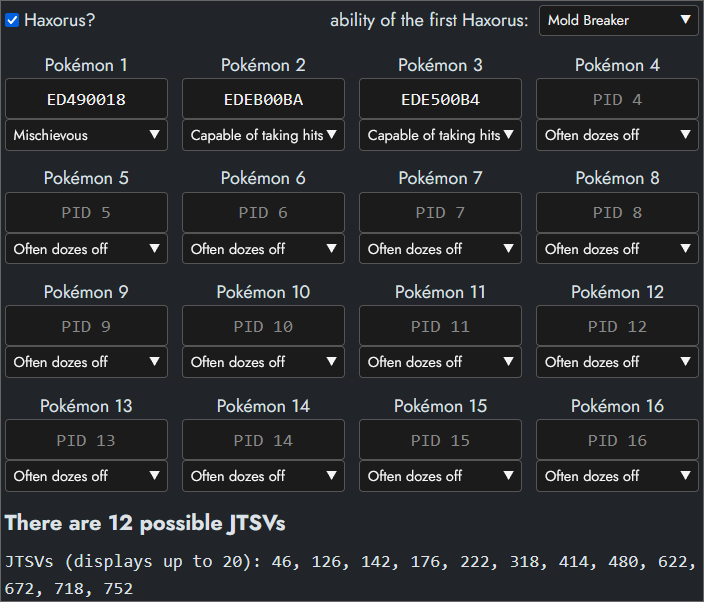
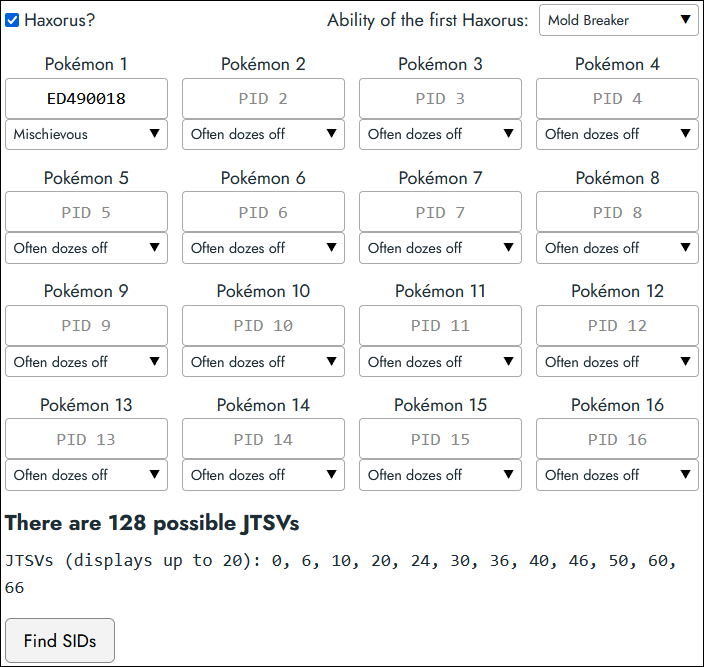
After having confirmed that the stats all match, you now need to start inputting data into the JTSV Finder tool that you can find on its own page, so that you don't have to scroll up and down between these explanations and the tool constantly.
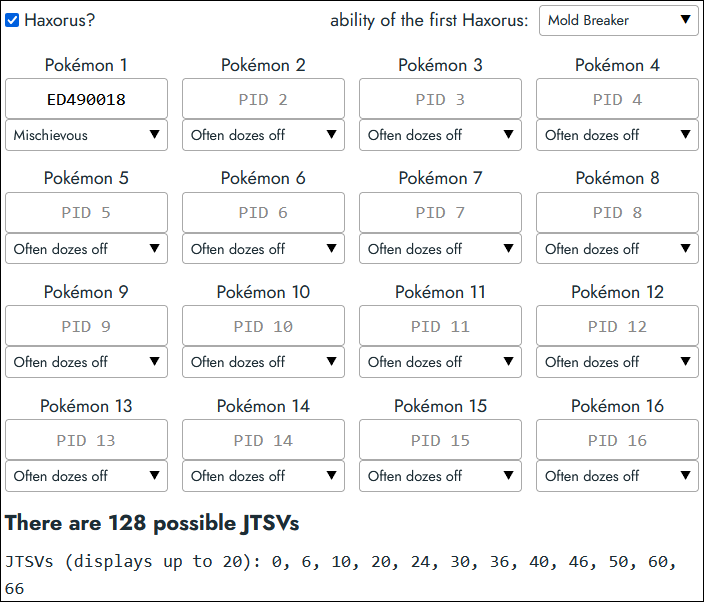
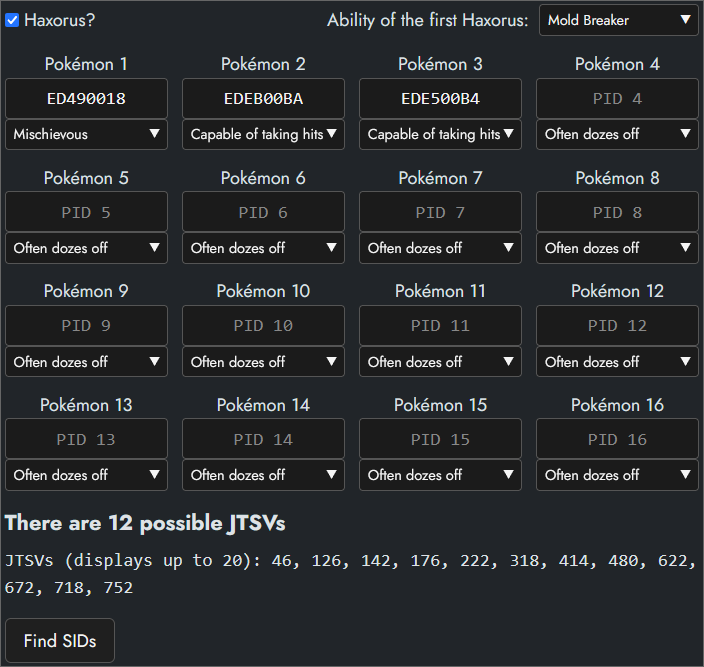
From this first Haxorus, we will need its ability, characteristic and PID in PokeFinder (if you're going for Gible / Dratini, ignore the ability and just take the characteristic and PID). Check off the Haxorus checkbox and select the ability of this first Haxorus. Then copy the PID over to the first Haxorus slot and select its characteristic. After all this, the tool may look something like this:
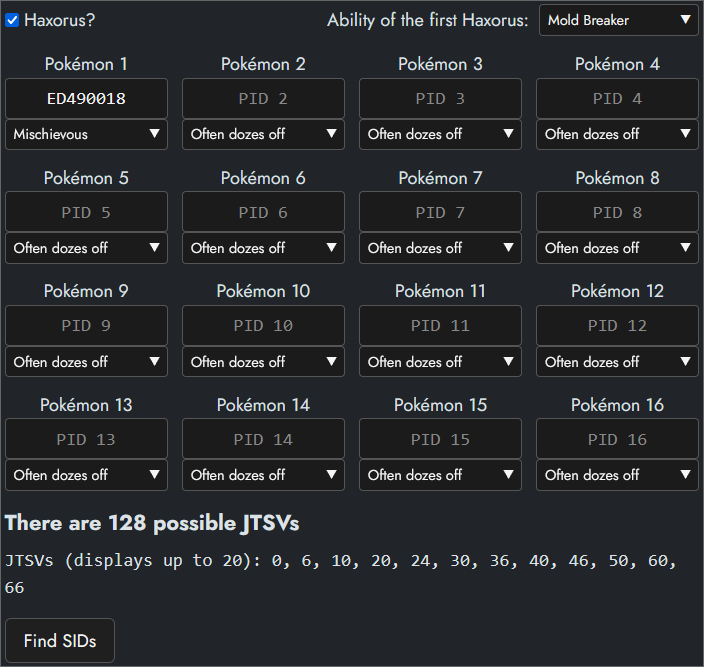
Now you must continue doing more RNGs to get additional Haxorus with perfect IVs, so make sure NOT to save after catching it. You may not just repeatedly catch the exact same Haxorus however. You need to get a different and new Haxorus every time. What I will do for my showcase is just RNG the Haxorus one Advance after another. I started with Advance 65 so next I'll RNG it to get the one on Advance 66, then 68, 69, 70 and so on.


I will skip Advance 67 because it has the exact same PID as Advance 66, making it useless for the method. Only unique PIDs are useful.
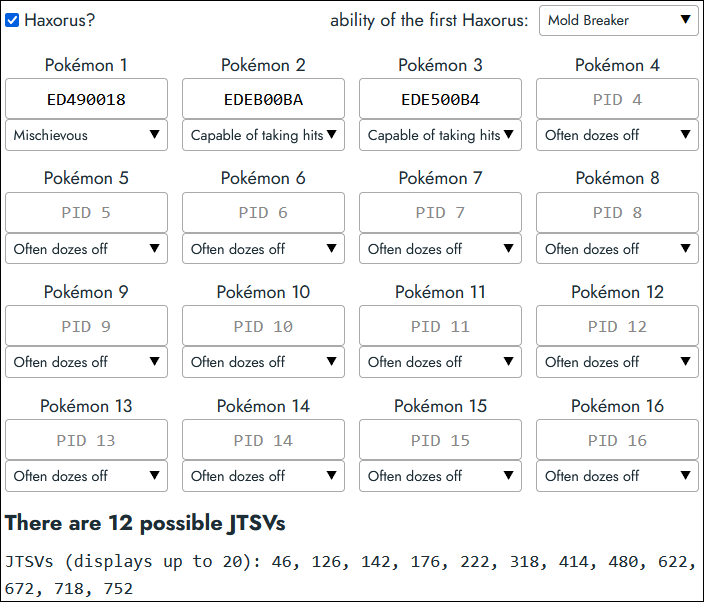
Here is my progress after 3 Haxorus; I'm already down to only 12 JTSVs!
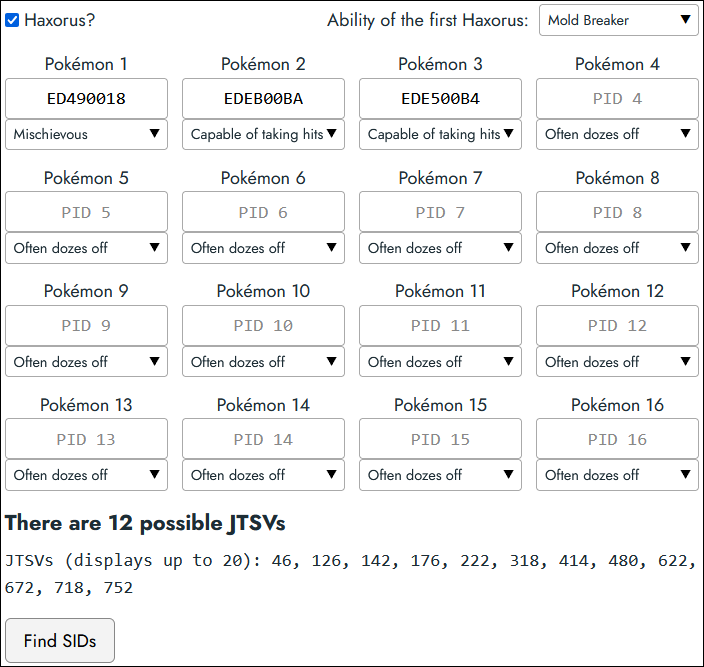
And after only 5 Haxorus I'm down to just a single JTSV! How many Haxorus you'll need to RNG may vary, but should usually be between 5-10 if you don't go for any duplicate PIDs. I got pretty lucky needing only 5.
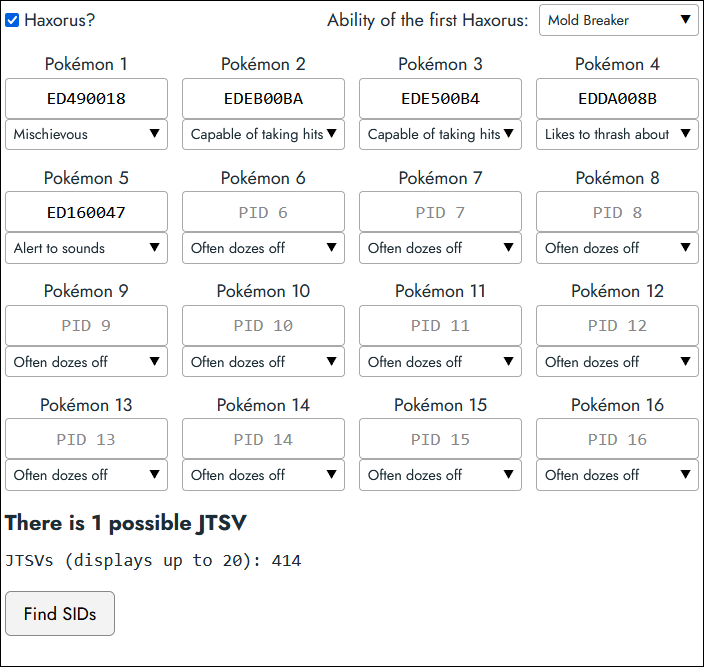
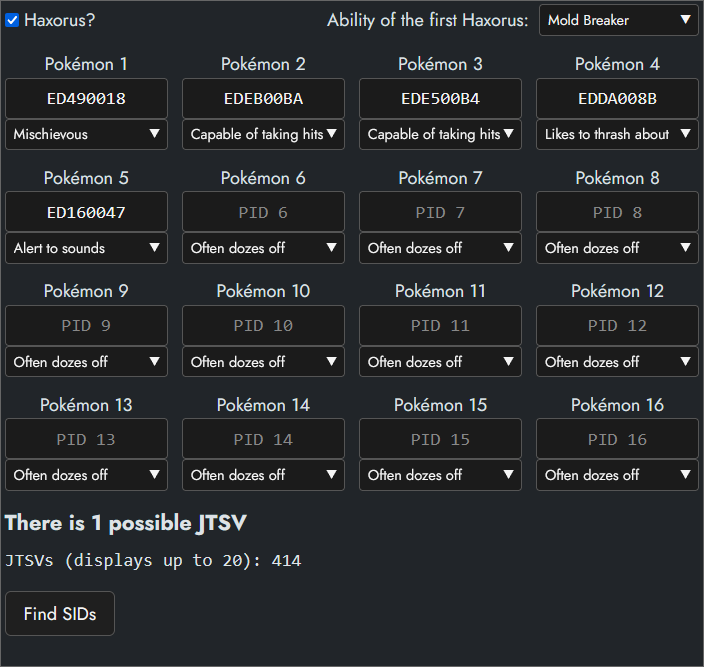
If you're going for Gible / Dratini, you may need to RNG them a few more times than you'd have to RNG Haxorus. Also don't forget that you're already done once you're down to 4 JTSVs, as you cannot go lower with Gible / Dratini.
With just 1 JTSV left (or 4 for Gible / Dratini), we can move on to the next phase.
Narrowing down the SIDs
Copy the result(s) you got, paste them into the SID tools "Starter seeds input field" and finally click on the "Find SIDs" button. This will now compare the Seed, Timer0, date and time of your earlier input possible SID seeds with these Starter seeds to find matches.
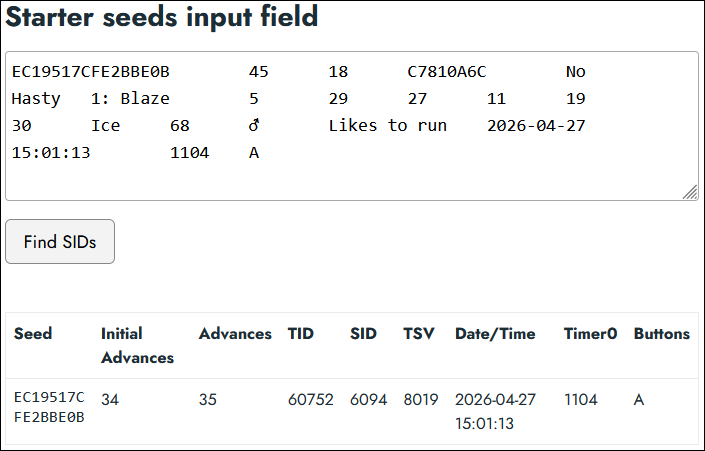

And I got a match!
If you got nothing, retrace your steps and make sure that your savefile and Starter fulfill all the requirements. If you're sure they do but still can't find any match, join im a blisy ._.'s RNG manip assistance Discord server and ask for help in the bw_b2w2 channel providing an explanation of the issue and a full window screenshot of your PokéFinder Static window.
Some of you may get multiple matches, especially if you didn't calculate the precise IVs or expanded the IV Advance range.
To showcase what to do when you get multiple matches, I'll use my results from the guaranteed shiny method for the next steps. Since I used the same savefile with the same TID/SID for both methods, this will still all be perfectly applicable for this Starter method.
Now you can click on the "Find SIDs" button.
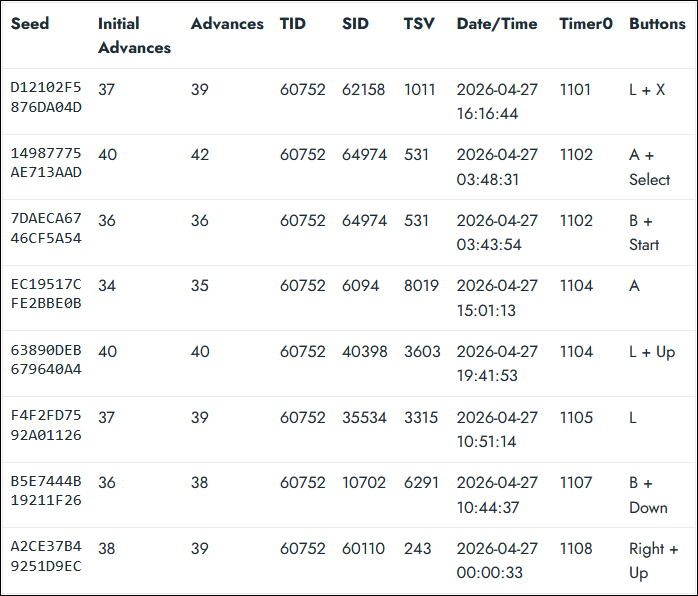
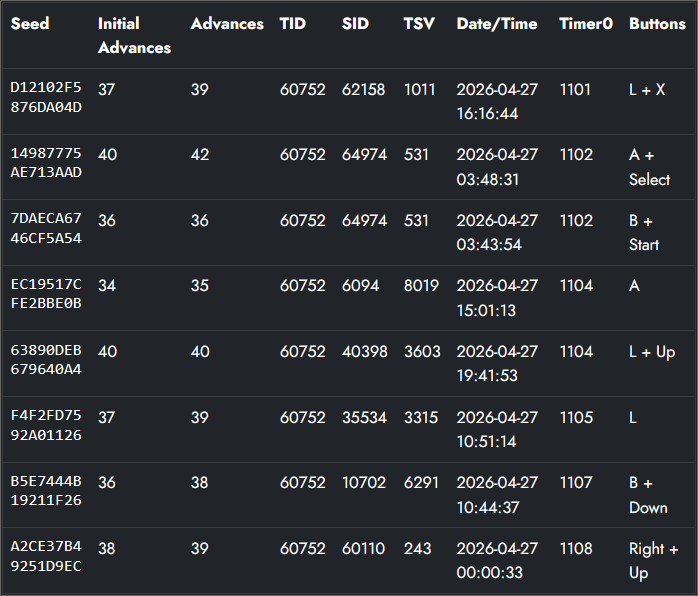
In my case, I got 8 possible results. Especially with Gible / Dratini, there may be a LOT more results than this however.
Finding your SID
And with that, the final phase begins: Testing!
You'll now need to test what SID of the ones given to you by the tool is the one you actually have on your savefile. Even if you just get a single match, you should still test it to be sure all went well. You can do this easiest by RNGing a shiny Static encounter, such as a fossil.
The basic process for this would be:
- Save in front of the worker that revives the fossils.
- Edit your main RNG Profile for this game to have your proper TID and then the first SID you want to test (the Profile with ONLY your most common Timer0, instead of the Profile with a larger range we created in this guide earlier).
- Search for a shiny e.g. fossil using that Profile (optimally aim for the rarer female fossil Pokémon, so that you can easier determine whether you hit the correct RNG Advance or not).
- If you hit your correct RNG Advance and it's not shiny, back to step 2 with the next best SID, but if it is shiny, congrats!
To determine what SID to start with, you'll want to have a look at the Keypresses, Advances, and time of day in that order of importance. It's generally unlikely for you to have more than 1 keypress (though it is possible) for this, so I'd immediately put all the results with 2 keypresses on the "backburner" to try only after all the 0 and 1 Keypress SIDs have failed. In my example that leaves me with with 2 potential SIDs to start with.

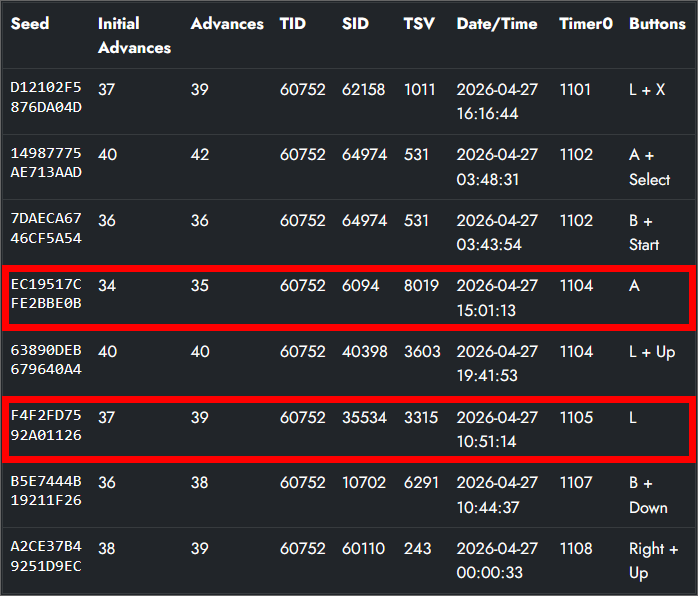
Since you advance the RNG by saying "No" when Professor Juniper asks you whether she got your name right during savefile creation, it's also unlikely that you'll ever have more than 1 Advance (though it is possible). So if the difference between the Advances and the Initial Advances column is larger than 1, I'll also put that SID on the "backburner" to try only after all the results with 0 and then 1 Advance have failed (still prioritizing 0 or 1 Keypress).
If you are still left with multiple possible SIDs, which is most likely for Gible / Dratini players, you can also use the time of day to try and help decide what SID to start with. If you know you generally had your DS set to the actual time of day it was at any given moment, and one SID has a time of 04:00:00 so 4 am, whilst another SID has a time of 15:00:00 so 3 pm, it's probably better to start with the SID that is at 15:00:00 / 3 pm.
Should all this narrowing down still have left you with multiple options, you may just have to decide at random which SID to start with.
And you can't expect to confirm your SID immediately on the first one you try; you may very well have to try several of them before finding the one you actually have. Good luck!
Next steps...
And that's it; hopefully you have found your SID relatively quickly; don't forget to put it into your RNG Profile within PokeFinder! If you'd like to RNG some shiny Static encounters now, check out the Static RNG guide. If you instead wish to do a Wild, Egg or other RNG, check out the Other guides section.
Thank you for reading and have fun RNGing!
Get the Pokemon you wanted? Consider supporting us on Ko-fi & keep us ad free!